DX Win: Achieving better Docker Build and Deploy Times!
Efficiently building Docker containers from large repositories is not a trivial thing. Learn how we optimised our Docker build times and image sizes by almost 80%.
Creating Black Holes
At Amazee Labs, most of our website projects are decoupled. That means they consist of multiple - and often technologically vastly different - applications that communicate over standard channels like file systems, HTTP or sockets. A very standard example would be a website that contains a "CMS" application that could contain a Drupal installation or simply a Netlify CMS config file, a "website" application that houses a Gatsby project for the static content parts and a real-time "community" application built on top of Next.js. Most of the time, there is also a "UI" package, that does not expose an application itself, but instead exposes a Storybook library of React components that are consumed by the other applications. And in addition to that, there might be even more shared packages covering different parts of the project's business logic.
All of this helps us to create clear boundaries and responsibilities for the different teams. The Drupal experts can work on the CMS application and expose a GraphQL API, while the UX and frontend team independently develop user interface components and showcase them in Storybook. And eventually, the React and Node cracks combine both in the actual application framework like Gatsby or Next.js.
Maintaining multiple Git repositories per project with different update schedules and interdependencies became a nightmare really quickly, so we decided to move to a mono-repository setup. Using Yarn's workspace features and Lerna, every application and package lives in a subdirectory of the same repository. They can be centrally managed, keeping a single release schedule and changing history for the whole project, while still imposing the boundaries outlined above. Awesome!
The underlying Dockerfile looked something like this:
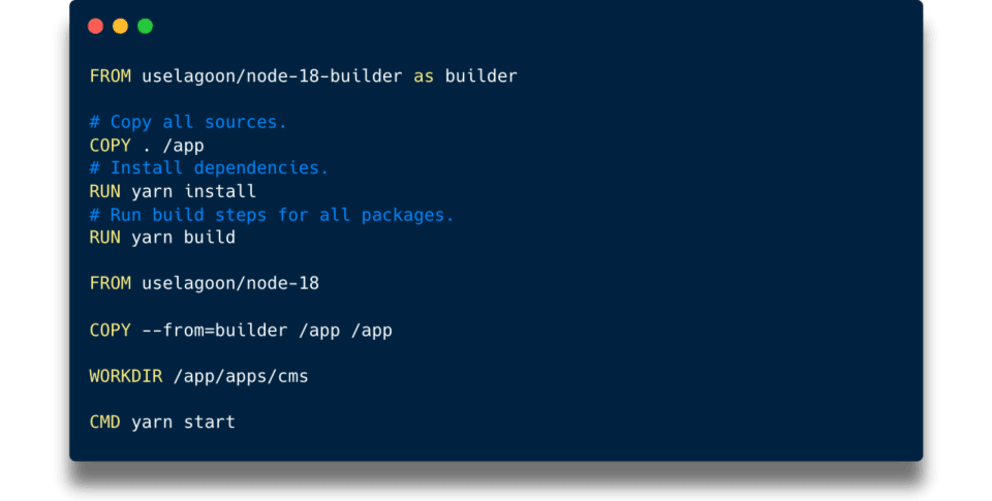
It was annoying that every code change triggered a full Yarn install, and that we had to maintain copies of that file for each service just with different WORKDIR settings, but it somewhat worked.
Until we got notified by our friends at amazee.io that our Docker images were "unusually big". Turns out that simply running “yarn install” in a monorepo and building images for different services from that, results in really big images (who would have known?!😱). I'm too embarrassed to publish any concrete numbers, but let's just salute amazee.io for the fact that they were even able to reliably run them.
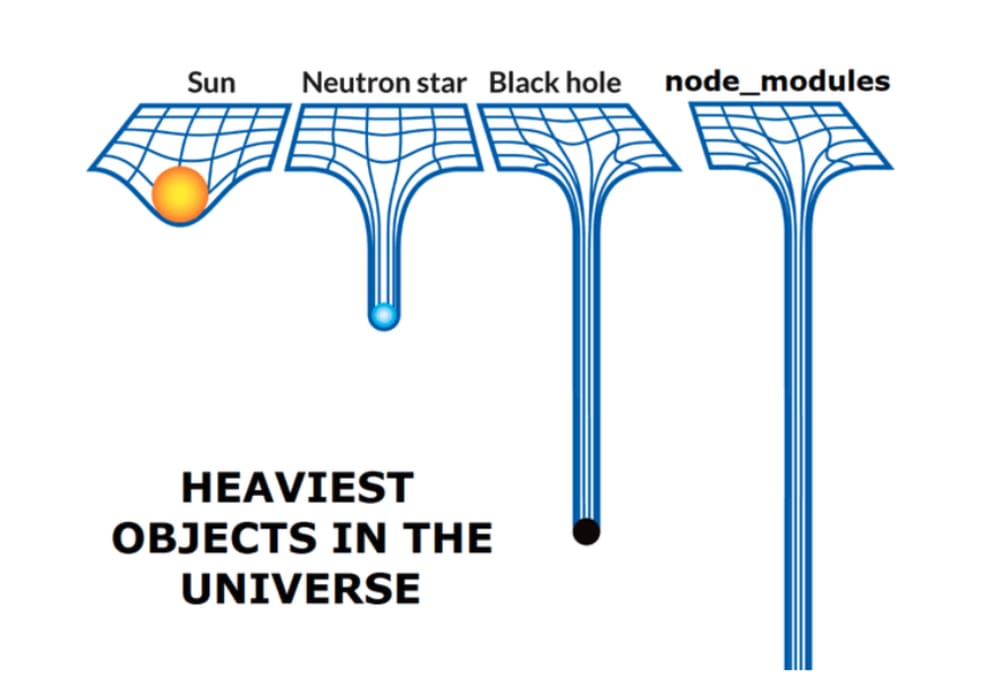
So we went on a journey to find the smallest possible image and shortest deployment time for our setup, and the result was totally worth it.
Use Layer Caches
The most obvious problem for us was the constant re-install of all dependencies on every CSS file change. Docker treats every line in a Dockerfile as its own layer that gets cached based on its inputs. That means, with every single change file, Docker would throw away everything it had already done below COPY . /app. It was therefore better to first install dependencies and then add the source code afterwards.
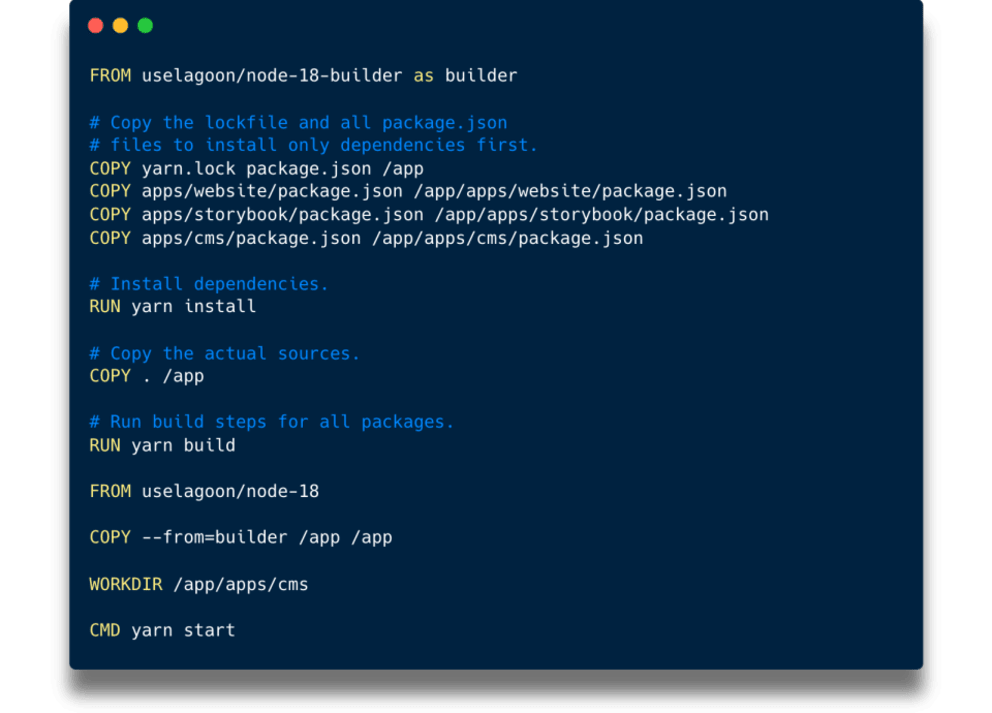
That at least resolved the problem of endless re-installs after small changes. Yarn install would only re-run when we actually changed something on any of the package.json or yarn.lock files. We did have some issues with newly introduced packages that were missing dependencies when deployed, because they were forgotten and not added here ("It works on my machine!"), but we had a bigger fish to fry. The actual image size was still the same. We had just managed to become faster at creating images that were too big.
Divide And Conquer
The PHP/Composer ecosystem, which has been our home turf for so long, does not really care about the "kind" of dependency at play, since almost everything is required at runtime anyway. Yes, Composer has a “--no-dev” flag which could save a little time and disk space if the PHPUnit is not downloaded to production, but the difference is barely noticeable.
Oh boy, the NPM world is different. With all the (great!) tooling that has emerged in Javascript, most dependencies are not required in production. A brief look at our "UI" package showed that there were a lot of dependencies that brought transpilers, type checkers, testing tools, formatting tools and even Storybook itself, but none of them were required at runtime. So we started organising our dependencies into three different categories:
- Regular dependencies (“dependencies” in “package.json”): Whatever is really required to run the application.
- Build dependencies (“devDependencies” in “package.json”): Packages required to transpile sources and make the application runnable in the first place. Examples are Babel, Rollup or Webpack.
- Tooling dependencies (“optionalDependencies” in “package.json”): Any tools that are used for developing and testing, like Jest, Vitest, Playwright (it includes a freaking browser!), Cypress, Storybook, Prettier, ESLint ... the actual heavy hitters. And the Docker image does not need any of them, since they run on our notebooks and CI.
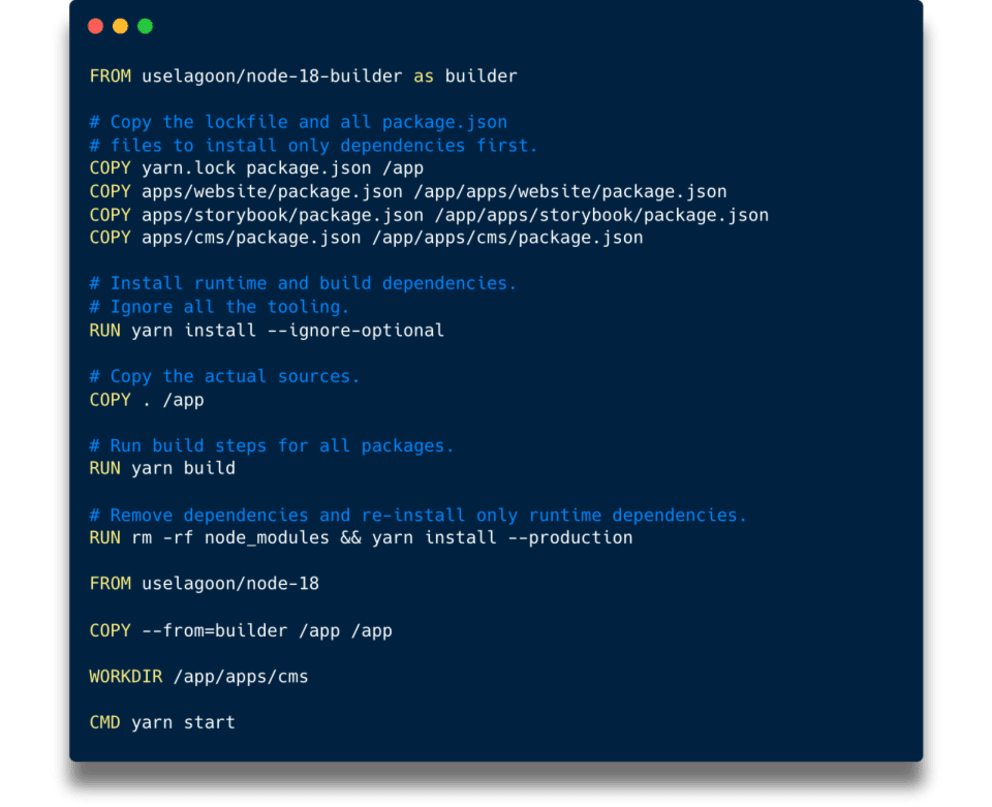
Our Dockerfile now omits all unnecessary tooling dependencies and even strips all build dependencies! That was a great step forward in terms of image size. But full reinstalls still took very long, and each service image included the dependencies of all other services, which was not great.
PNPM Enters The Stage
PNPM is an acronym for “performant NPM”, and it wastes as much resources while installing dependencies as its inventors spent on coming up with a creative name. None.
It is advertised as a "Fast, disk space efficient package manager". It really achieves that by putting all dependencies on a machine into a single store and just hard links them into the project. This is great for local developer experience where re-installs happen often and the same dependencies are used across different projects.
Another noteworthy trait is its strictness. By default, it will make sure that every package only has access to the packages it declares as dependencies and in exactly those versions. By comparison, Yarn will hoist as many packages as possible to the top-level node_modules folder. Combined with Node's module resolution algorithm, the result is best described as "YOLO", and we often ran into issues of duplicated or version-conflicted dependencies. But PNPM handles this all very well.
Which is great, but none of that was going to help us to reduce our image size. The final decision to switch to PNPM was due to a small command called deploy. It is specifically designed for mono-repositories and allows one to create a reduced, deployable artefact from any given package in the repository, resulting in much smaller image sizes.
Yet another benefit of PNPM is the fetch command, which downloads all dependencies to the central storage based on the lockfile only. This means that we can eliminate copying every “package.json” file manually at the beginning of the Dockerfile which reduces the amount of unnecessary re-installs even further.
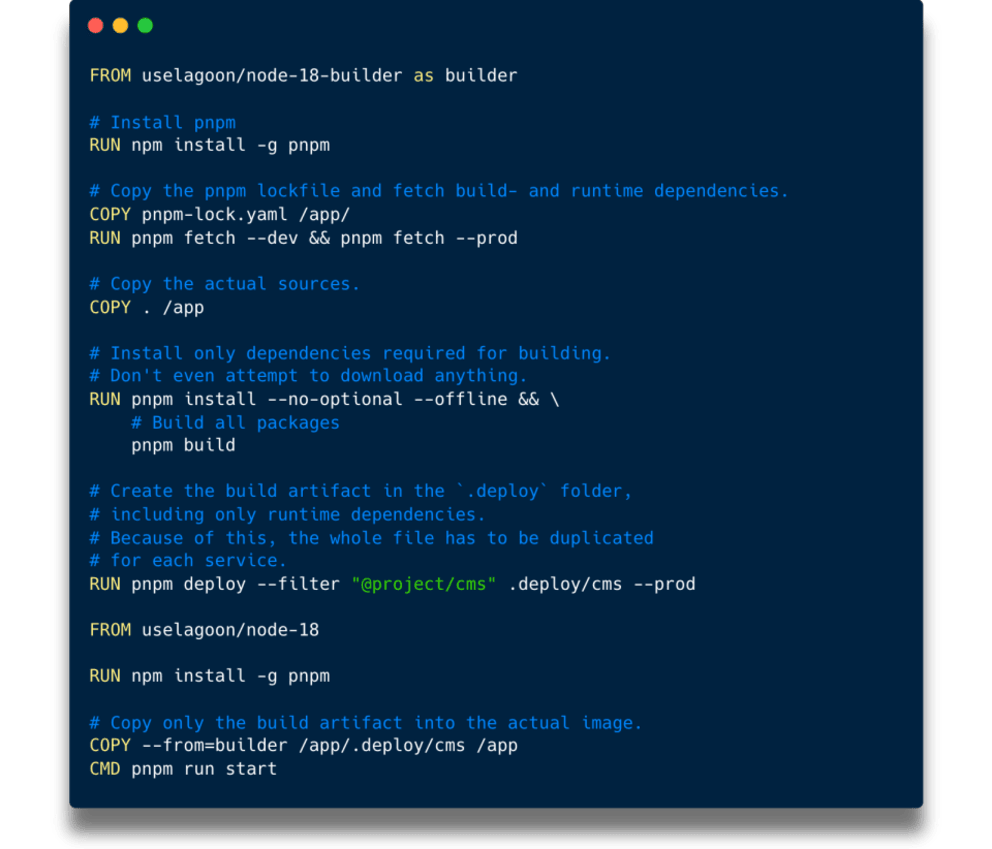
Now the Docker image is as small as it can be, since only runtime dependencies will actually be included. We reached our goal on that end, but it still hurts that the build process will re-install all dependencies even when just one of them is changed.
Even More Caching with Buildkit
Since release v2.11.0, Lagoon supports BuildKit, which allows us to use a couple of advanced features when building Docker images. One of them is the ability to use a dedicated cache when running commands. Since [Docker build cache] operates on layers and run cache adds another layer on top of that, it might be a mind-bender at first.
In a nutshell, it allows the RUN Dockerfile instruction to persist a given directory across multiple builds. So it might fill this directory with files on the first build, which will still be there on the second.
We can leverage that to persist the PNPM store across builds, so even if the lockfile changes, only new dependencies have to be downloaded. To make this work, each command that involves PNPM has to be instructed to use the same cache directory. The same principle can be used for Composer caches as well.
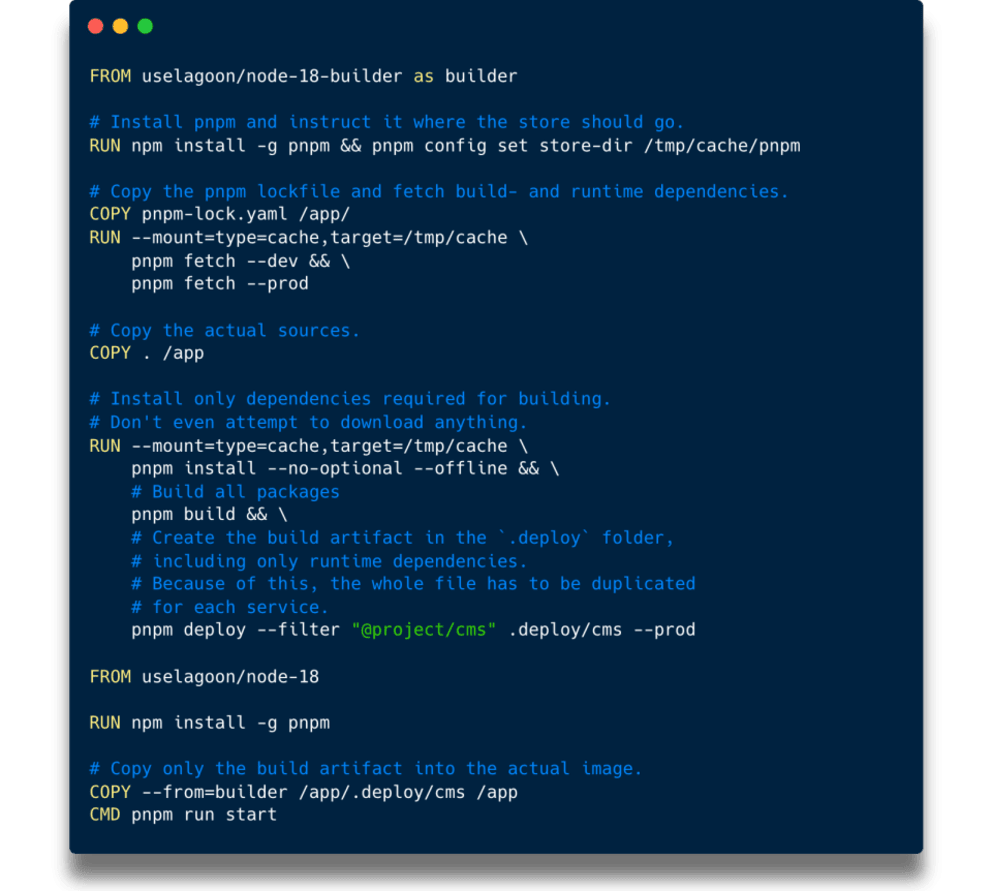
And that’s how we squeezed the last bit out of our build times, and they shouldn't drop any more every time a small package is added anywhere in the project. Unfortunately, we made a Dockerfile that has to be duplicated for each service even more complicated though, which is a maintenance problem.
Cleaning Up The Mess
Which is where another BuildKit feature comes to the rescue: Build stage targets. It allows us to define multiple target images within the same Dockerfile using multistage builds. That means we can merge all our service Dockerfiles into one and only create separate sections of the last 3 commands for each service, instead of duplicating the complicated PNPM cached install all over the place.
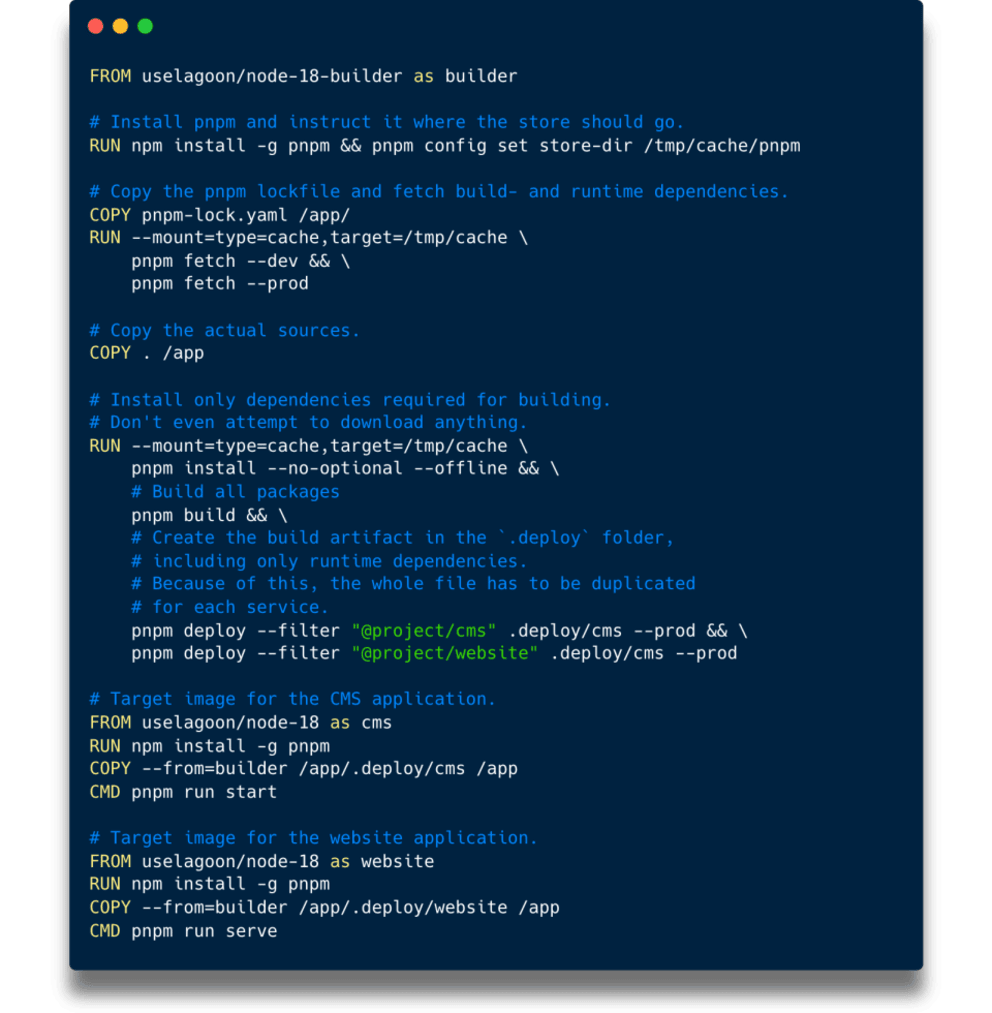
To make use of this, we also have to instruct the docker-compose.yml to use different build targets per service. This is a simplified example. A Lagoon project's docker-compose.yml still needs all the other options outlined in their documentation.
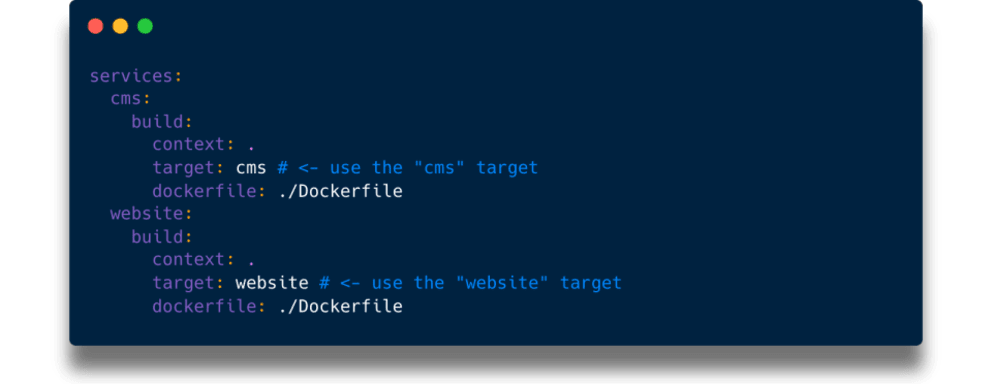
That's it. Our journey to better build and deploy times on Lagoon (or any other Docker-based hosting environment) has come to a satisfying conclusion. For sure, there are some more gains that could be achieved here and there, but the steps outlined above greatly reduced our time to production on our biggest projects from 45 minutes down to ~10 minutes and the disk space needed for Docker images down to almost 15%. And no, that’s not a typo - not down “by” 15%, it's down “to” 15%!
If you're looking to improve your own build and deploy times, we encourage you to give these techniques a try and see the results for yourself. And if you need any help or have any questions, please don't hesitate to get in touch. Thank you for following along on our journey, and we look forward to continuing to improve our processes and share our findings with you in the future.